For decades, QuickBooks has been the leading accounting software for small to medium-sized businesses, allowing for the organizing of business finances, tracking performance, processing payroll and more.
One of QuickBooks’ most valuable tools is the ability to email attachments easily and seamlessly to customers and coworkers alike. The in-app mailing feature saves time by letting you email documents straight from the application. Using QuickBooks’ Secure Webmail functionality also ensures the data you’re sending is verified and protected.
Why attach and send email attachments from QuickBooks?
One of the most common use cases for emailing attachments from QuickBooks is to send copies of terms and conditions, contracts or images related to an invoice.
Why attach and send files directly from within QuickBooks? Here are a few reasons:
- Improved workflow and productivity: It would be a pain to export and save a file to your desktop only to re-upload it as an attachment to your email and then send it to the client. Using the QuickBooks’ Secure Webmail in-app feature allows you to skip those extra steps, saving a few minutes each time you send a file.
- Protected and secured client files: It’s called “Secure Webmail” for a reason. Exporting files to a local desktop introduces unnecessary security risks. Keep your clients’ files confidential and secure using QuickBooks’ broad array of built-in tools.
To start sending attachments from QuickBooks, you just need a few things:
- QuickBooks (obviously)
- A work (or work-friendly) email address
- A sales form, invoice, quote or other attachment already imported into QuickBooks
The person receiving the email just needs a PDF viewing program available since all attachments are sent out in a standard PDF format.
Now that we’ve covered the basics, let’s go over the instructions!
QuickBooks tutorial: How to attach and send files
Step one: Start by opening a Transaction that already has an attachment. If there are currently no files attached, you can click Attach File to add them.
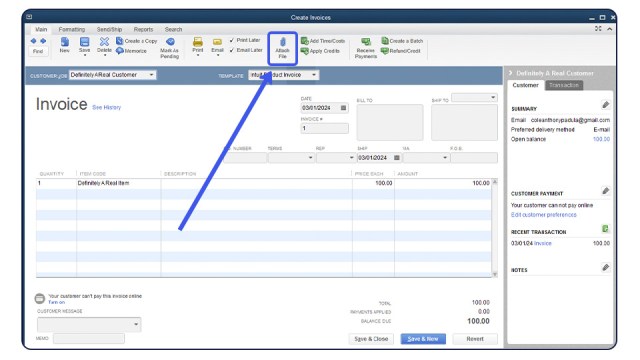
Select files from your computer or drag and drop them into the Attachments window. Click Done to save.

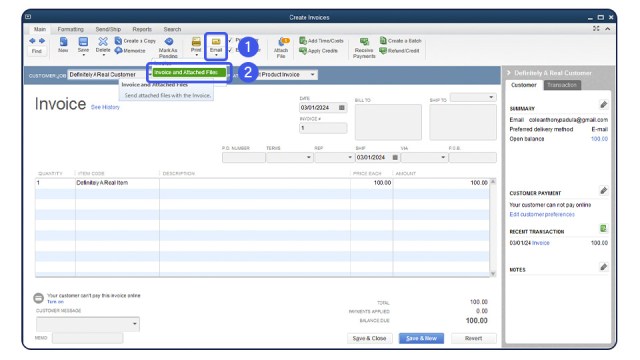
Step two: From this window, select the Email icon. In the drop-down menu, select [item] and Attached Files.
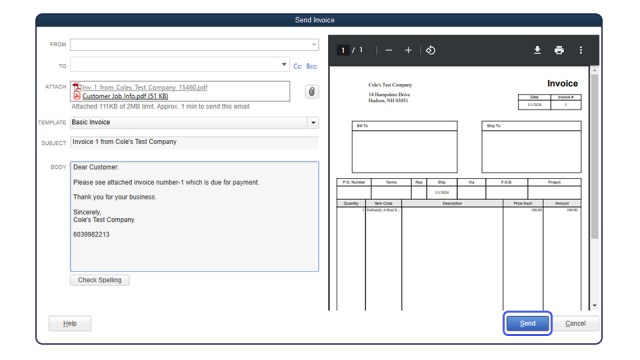
Step three: Confirm that the email template, body and attachments are correct. Then, click Send.
Need more QuickBooks help?
Keep your Downloads folder clear, save time and keep your client files secure by linking your email to QuickBooks. If you haven’t set up your email in QuickBooks yet, you can find instructions for the setup process below.
- Setting up email in QuickBooks
- Setting up and emailing in QuickBooks (video)
- I can’t email from Gmail in QuickBooks
- More on emailing from QuickBooks
- Emailing pay stubs
Gain even more with QuickBooks hosting
Most people hate having to log in to dozens of different services all the time! And there are many reasons for staying within one multitool application, such as QuickBooks, while you work.
But what if you wanted to take productivity, security and QuickBooks one step further? That’s where Rightworks OneSpace comes in.
Our range of QuickBooks Desktop hosting solutions, created for accounting firms and small businesses, gives users one intelligent cloud environment to work from. By hosting QuickBooks Desktop in the cloud, users gain security, productivity and workflow advantages—and so much more.
Learn more about hosting QuickBooks in the OneSpace intelligent cloud.